Work in Progress

Quatre Bras 16th June 1815

Posted by C M Dodson on 25 Feb 2018, 17:30

I have been sculpting the Bois du Bossau.

This wood was fiercely contested initially by Nassau troops and eventually cleared of Frenchmen by the Guards in the original battle.

The Duke was given this woodland as a gift and promptly chopped it down for timber!

Having stated ' what have they done to my battlefield ' when visiting Waterloo he does seem to have forgotten his own vandalism. Perhaps he did not wish to remember this action where his initial orders were disobeyed and the Dutch Belgians saved the day?

I have used over one hundred trees so far mainly Gaugemaster sea foam and Woodland scenics forest canopy.

In addition I discovered from a wander around the garden the seed heads of sedum plants, the same as Woodland Scenics! Net saving of at least fifty English pounds. I will be planting more in the spring!

Also, chopped up shrubs decorated with glued on sea foam bits and then flocked help make up the larger specimens.

Image

The ground work is scatter and the seed heads and debris from the forest canopy box.

Image

The view towards Le Trois Bras showing the Woods
Image

Next up, the heights of Liralle.

Chris
Last edited by Paul on 23 May 2018, 16:14, edited 1 time in total.
Reason: pic links fixed
C M Dodson  United Kingdom
 
Posts: 2673
Member since:
01 May 2015, 18:48


Posted by Paul on 25 Feb 2018, 18:16

C M Dodson wrote: In addition I discovered from a wander around the garden the seed heads of sedum plants,

Sedum telephium ?
Image
User avatar
Paul  China
 
Posts: 11724
Member since:
25 Nov 2008, 09:31

Posted by C M Dodson on 25 Feb 2018, 18:51

Hi Paul.

That's the fellow. If you spray the trunks with brown dye it creates a variation or just leave them au natural.

Best wishes,

Chris
C M Dodson  United Kingdom
 
Posts: 2673
Member since:
01 May 2015, 18:48

Posted by Paul on 25 Feb 2018, 21:42

Thanks Chris :yeah:
I was thinking of using some myself, I´ve got some in the garden and at work (that´s how I guessed which sort of Sedum you meant) but the stems are a bit brittle. Do you treat them or (apart from spray painting them) leave them as they are?
User avatar
Paul  China
 
Posts: 11724
Member since:
25 Nov 2008, 09:31

Posted by C M Dodson on 25 Feb 2018, 21:53

Hi Paul,

I just break off the fragile bits first.

Best wishes,

Chris
C M Dodson  United Kingdom
 
Posts: 2673
Member since:
01 May 2015, 18:48

Posted by Rich W on 26 Feb 2018, 23:32

This is looking fantastic! I'm enjoying watching your progress with this.
Rich W  United Kingdom
 
Posts: 1335
Member since:
05 Feb 2018, 23:40

Help keep the forum online!
or become a supporting member

Posted by Graeme on 27 Feb 2018, 05:39

This just keeps getting better. I always like your close up shots from inside woodlands, with the fallen tree trunks and leaf litter. they always look so realistic. Looking forward to seeing this one shrouded in musket smoke.
User avatar
Graeme  Australia
 
Posts: 1565
Member since:
27 Nov 2015, 02:39

Posted by FredG on 27 Feb 2018, 08:51

Graeme wrote: Looking forward to seeing this one shrouded in musket smoke.


I still think Chris is somehow related to Michael Bentine.

How long will this stay together Chris? Start - dismantle?
Also, will we see a video? 8)
User avatar
FredG  United Kingdom
 
Posts: 1594
Member since:
09 Dec 2011, 21:47

Posted by C M Dodson on 27 Feb 2018, 09:12

Thank you everyone for your kind comments and encouragement.

The 'set' is nearly complete and I presently am sculpting the heights of Liralle.

I will then 'dress' the battlefield with farm implements etc before commencing the action.

The timescale will depend on how long the re fight takes Fred but I suspect quite some time. I have most of the troops ready but have yet to start on Pictons fifth division never mind the Hanovarians.

Once the action is complete it will be cleared away for the next project. I have lots of ideas, oh no.

I am toying with a Ligny video so we shall see. In the meantime Photobucket have removed the links so I am uploading the pictures to the far superior Postimage before re submitting them as a set.

Lots to do.

Thank you again.

Chris
C M Dodson  United Kingdom
 
Posts: 2673
Member since:
01 May 2015, 18:48

Posted by C M Dodson on 02 Mar 2018, 16:45

I have been experimenting with railway modelling backdrops for my Quatre Bras re fight.

Having researched this subject I chose ID Backscenes as having the best range for my purposes.

They come with a peel off backing to attach them and a ten foot section comes in two halves. There is a white border that need to be removed if you are joining two sections. I initially used wallpaper scissors but a steel rule and a very sharp modelling knife is better.

I mounted mine on 2000 grade lining paper so that I can use my washing line and clothes leg system. This gives a decent amount of rigidity without losing too much flexibility.
Image

Image

Many thanks to the Feldmarschall for her assistance in rolling the paper out to avoid creases.

I have attached a link giving guidance which I hope fellow modellers will find useful.

https://modelrailwayengineer.com/model- ... ackscenes/

Happy modelling.

Chris
Last edited by Paul on 23 May 2018, 16:08, edited 1 time in total.
Reason: pic links fixed
C M Dodson  United Kingdom
 
Posts: 2673
Member since:
01 May 2015, 18:48

Posted by sansovino on 02 Mar 2018, 19:35

It´s a pleasure to follow your process...
sansovino  Germany
 
Posts: 794
Member since:
27 Mar 2014, 21:42

Posted by Beano Boy on 02 Mar 2018, 19:56

Other railroader tips are to curve the backing paper around corners instead of having sharp right angle edges on show. Paper card is ideal for curving around these areas. Tall buildings or tree`s or both can partly help hid a straight join where the backing picture is of concern.

Chris,may all your problems be tiny ones to overcome,
and always remember the craziest of ideas often work. :-D BB
Beano Boy  England
Supporting Member (Gold) Supporting Member (Gold)
 
Posts: 8125
Member since:
03 Sep 2013, 14:45

Posted by MABO on 03 Mar 2018, 09:16

I have gone trough the whole project again. You made such a great progress. I am waiting for the first divisions to reach the battlefield...
User avatar
MABO  Europe
Supporting Member (Gold) Supporting Member (Gold)
 
Posts: 9170
Member since:
12 May 2008, 18:01

Posted by C M Dodson on 05 Mar 2018, 12:22

When using sea foam for trees there is usually a pile of bits that whilst great for hedges are left over.

However, a wander around the garden can produce good looking natural tree trunk material such as fuchsia bushes etc.

Image

The spare sea foam bits can be glued onto the trunk to build a very nice canopy which allows bigger trees to be manufactured than you would normally get in a pack.

Image

When flocked the results are, in my opinion quite pleasing.

I use a railway modellers trick of spraying the trees with extra hold hair lacquer.

You can use glue, but I found that it can get 'stringy' and spoil the look.

The finished result whilst a bit delicate is ideal for dioramas and if the flock gets knocked off it can be redone!

Image

Happy modelling.

Chris
Last edited by Paul on 23 May 2018, 16:10, edited 1 time in total.
Reason: pic links fixed
C M Dodson  United Kingdom
 
Posts: 2673
Member since:
01 May 2015, 18:48

Posted by C M Dodson on 16 Mar 2018, 20:08

I have been experimenting with back drops on my nearly finished battlefield.

These are test shots which I am pleased with. The only potential problem is the lack of sky for future pictures taken at an upwards angle.

I have some ideas that I wish to experiment with before I commence the re fight that will hopefully overcome this.

The view from Gemincourt stream with the farm to the south.

Image

Looking south towards the Ferme Liralle.

Image

Sheep pens at Ferme La Bergerie.

Image

The view from Quatre Bras, the farmhouse and inn, La Baraque looking south towards Frasnes and the original French position.

Image

I hope to start the deployment of the Prince of Orange's 2nd Netherland division very soon and get the re fight started.

Happy modelling,

Chris
Last edited by Paul on 23 May 2018, 16:11, edited 1 time in total.
Reason: pic links fixed
C M Dodson  United Kingdom
 
Posts: 2673
Member since:
01 May 2015, 18:48

Posted by Graeme on 17 Mar 2018, 03:29

The railway backdrops look really good and you've blended them in with the foreground seamlessly.

The view down the road between the buildings is terrific and will look even better with battalions of troops marching down it. And I love that top idylic landscape shot. If you put that picture on "Sykes" I'd be trying to book the cottage for a week :-) ... As long as it has a washer/dryer and I can walk to the pub.
User avatar
Graeme  Australia
 
Posts: 1565
Member since:
27 Nov 2015, 02:39

Help keep the forum online!
or become a supporting member

Posted by MABO on 17 Mar 2018, 16:33

I second that! Very impressive groundwork here. One will believe that it is real landscape. I wait for the figs!
User avatar
MABO  Europe
Supporting Member (Gold) Supporting Member (Gold)
 
Posts: 9170
Member since:
12 May 2008, 18:01

Posted by sberry on 24 Mar 2018, 09:57

This landscape is really stunning, and it is pure pleasure to look at it - even now, without any figures yet, it looks like photos from real life.
User avatar
sberry  Germany
 
Posts: 962
Member since:
12 Mar 2010, 20:37

Posted by C M Dodson on 28 Mar 2018, 19:03

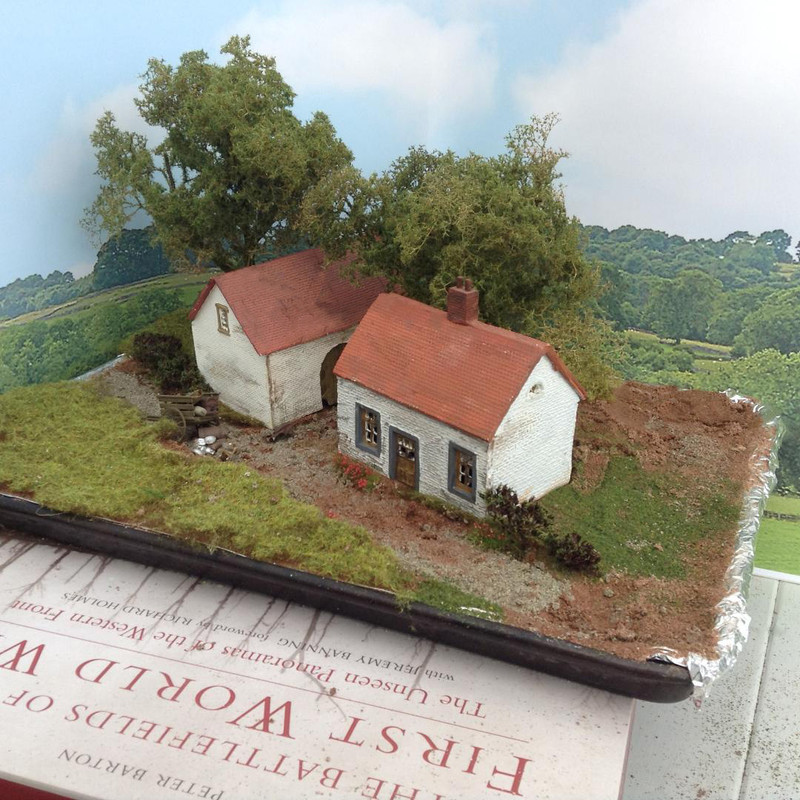
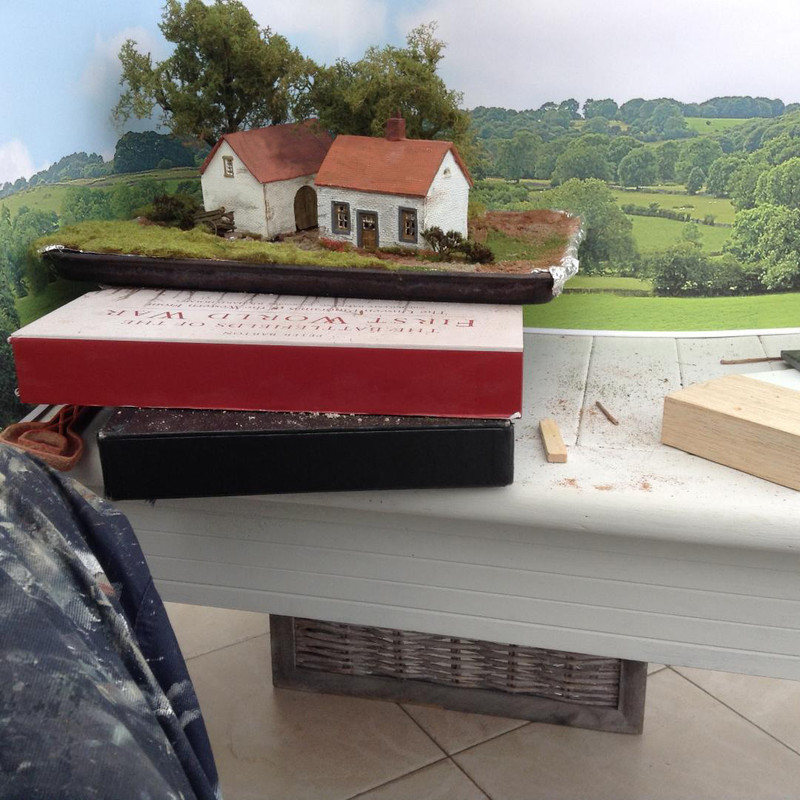
I have been experimenting with the backdrops for special scenes.

I firstly obtained my lovely wife's [ with her permission ] baking tray and followed my usual procedure in building up the scene.

Image

Having built the scene the background is put into place and the height of the model is adjusted for the camera angle required.

Image

Image

The results can be pleasing.

Image

However, the height of the landscape needs to be kept in mind as the undulating countryside can quickly turn into a mountain range. ie The view between the houses.

Image

My friend General Picton raised this very issue and I am grateful to him for this. The problem is I feel optical, as long range shots tend to soften backgrounds but close up shots can exaggerate height.

For my re fight I originally lowered the backgrounds but have now replaced part of it with a lower countryside profile that seems to work well.

Many thanks to Jamie for highlighting this before my battle really got underway and presented weird horizons!

Hopefully, it is now 2PM, 16th June 181, time to commence the action.

Vive L'Empereur
Last edited by Paul on 23 May 2018, 16:12, edited 1 time in total.
Reason: pic links fixed
C M Dodson  United Kingdom
 
Posts: 2673
Member since:
01 May 2015, 18:48

Posted by C M Dodson on 31 Mar 2018, 18:58

Quatre Bras question

I am about to start my re fight of Quatre Bras.

However, I am unsure about the 2nd Legere.

Adkin states that this was transferred to Bonaparte's 6th Infantry Division on the 10th June. Mr Adkin is in my opinion a fine researcher.

Meanwhile, Field and Ospray have them in action at Piramount at the commencement of the action when the 6th Division was still en route. Once again Mr Field is a fine researcher.

Has anyone got information to clarify this?

I thought modelling the landscape was complex due to contradicting information but this is bonkers.

Thank you in anticipation as I would like to get this right.

Chris
C M Dodson  United Kingdom
 
Posts: 2673
Member since:
01 May 2015, 18:48

Previous pageNext page

Return to Work in Progress